Last modified by MammaMia - 2 years ago
711 Views
6 min read

How to sell event tickets using WP Easy Events and WooCommerce

In this article, I will provide step by step instructions on how to sell event tickets using WP Easy Events and WooCommerce WordPress plugins.

Let's say you have a Yoga studio and want to sell tickets to your Vinyasa Flow 2-3 class. You decided to have a membership program which offers tickets to your classes at a discount based on your customer's membership level. The members will be able to purchase tickets at Silver, Gold and Platinum membership levels.

If a customer has no membership he or she has to purchase tickets at the full price. We want our customers purchase tickets before the event start and bring their tickets to the event location so that staff members can check them in using the QR code on the ticket. The class will be offered on every third Monday of every month for the next 24 months.

You will need to download/purchase and install the following software before you start this exercise:

To be able to implement this scenario, we need to:

  1. Create one to many Organizers
  2. Create one to many Venues
  3. Create one to many Performers
  4. Create our Yoga class event
  5. Create a ticket product in WooCommerce
  6. Link WooCommerce ticket to our event
  7. Create a recurring event

Creating Organizers for your events

Organizers are people who are responsible for planning and execution of events. WP Easy Events WordPress plugin allows to create one to many Organizers and link them to your events as needed. Events can be hosted by multiple organizers. Organizers have their own pages.

In our Yoga Class, we will have only one organizer at this time but we are planning to have classes with other Yoga Studios as well.

If you're the only organizer and you don't want to display a separate Organizer page, you can disable Organizer option under the Event Settings > Settings > Entities > Events > Attributes section. In this case, skip the instructions below.

To create an event organizer:

  1. Log in to your WordPress Administration Panel.
  2. Click the 'Events' tab.
  3. Click the 'Add New Organizer' link to see the Organizer Edit screen.
  4. Fill in all the required fields, add Event categories, tags etc..

Creating Event Venues for your events

Event Venues are places where your events happen. WP Easy Events WordPress plugin allows events happening at multiple locations. You can create your venues once and link them to your events as needed. Venues have their own pages displaying upcoming events at that location.

To create your event venue:

  1. Log in to your WordPress Administration Panel.
  2. Click the 'Events' tab.
  3. Click the 'Add New Venue link to see the Venue Edit screen.
  4. Fill in all the required fields, add Event categories, tags etc..

Creating Performers for your events

Performers are people who provide services at your events. Services could be speaking, entertaining or any other activity. Events may feature one to many Performers. Performers have their own pages displaying the upcoming events they will be performing.

If you're the only performer and you don't want to display a separate Performer page, you can disable Performer option under the Event Settings > Settings > Entities > Events > Attributes section. In this case, skip the instructions below.

To create a performer:

  1. Log in to your WordPress Administration Panel.
  2. Click the 'Events' tab.
  3. Click the 'Add New Performer link to see the Performer Edit screen.
  4. Fill in all the required fields, add Event categories, tags etc..

Creating a Yoga Class event page

  1. Log in to your WordPress Administration Panel.
  2. Click the 'Events' tab.
  3. Click the 'Add New' sub-tab or the “Add New” button in the event list page.
  4. Under the edit screen, fill in your event description.
  5. Under "Event" panel, fill in the fields under "Details" tab.
  6. Under "Event" panel, click on "Registration" tab.
  7. Select WooCommerce for Registration Type.
  8. Fill in 'Attendee Instructions' for the instructions displayed on the event registration form.
  9. Fill in 'Attendance Text' for the instructions displayed on the event tickets.
  10. As needed, set event category and tags. Event categories and tags link your events to Venues, Organizers, Performers and other Events. Using Event categories and tags, customers can see the offerings on your site related to a certain term. Please note that to display event organizers, venues or performers specific to your event, you must link them to you event.
  11. Click on "Create Connections" links on Organizers, Performers and Venues panels to link the corresponding records which created in the previous sections to our Yoga Class event.
  12. If you have other Yoga Class events that are directly related to this event and you want to display them on the event page, link their records by clicking on "Create Connections" link under "Related Event" panel.
  13. Fill in the excerpt section for the summary of your event. This text is displayed at the event archive, category and tag pages as well as the front teaser section of the event page.
  14. When you are ready, click Publish. If you do not have publish privileges, the "Submit for Review" button is displayed.

Creating WooCommerce event ticket

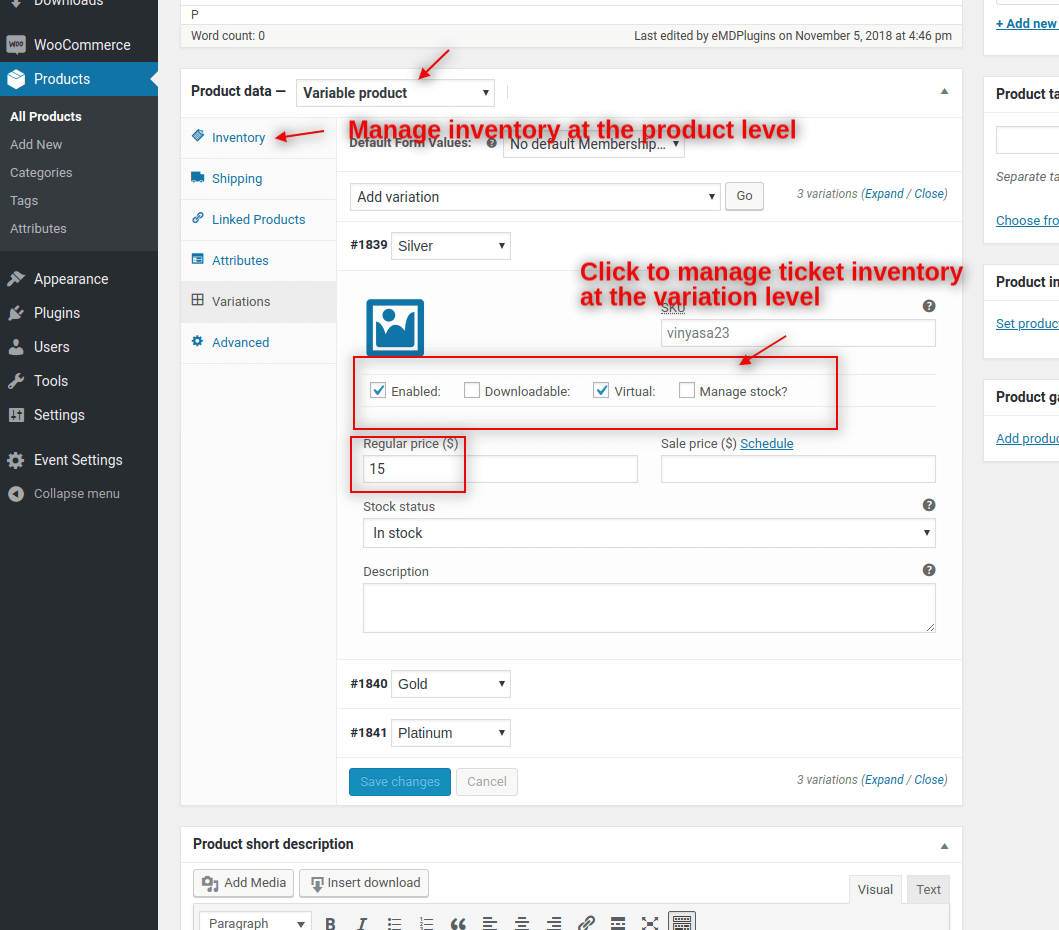
To be able sell tickets using WooCommerce WordPress plugin, we need to create an event ticket as a product. Since we would like to offer discounts for members, we need to create a variable product type.

If you don't want to offer discounts on different membership levels or keep it simple, just create a Simple Product.

To add a variable product, create a new product or edit an existing one:

  1. Go to WooCommerce > Products.
  2. Select the Add Product button or Edit an existing product.
  3. Select Variable Product option from the Product Data dropdown.
  4. Create event ticket attributes
  5. Create event ticket variations

If you're not familiar with WooCommerce, you can follow the instructions in the following section to create attributes and variations for your Yoga Class event ticket.

Creating Ticket product attributes

Click on the Attributes section to create attributes before creating variations. You can create custom attributes specific to your Yoga Class or use global attributes that are site wide.

To use a global attribute:

  1. Select one from the dropdown and Add.
  2. Choose Select all to add all attributes to your ticket.
  3. Make sure to check the Used for variations checkbox to use the attribute for your variations.
  4. Save attributes

Custom attributes specific to product

  1. Select Custom product attribute, and Add.
  2. Name the attribute such as Membership.
  3. Set values separated by a vertical pipe (e.g., Silver | Gold | Platinum)
  4. Make sure to check the Used for variations checkbox to use the attribute for your variations.
  5. Save attributes

Creating Variations for your ticket

  1. Go to Variations section.
  2. Select Add variation from the dropdown and click Go button.
  3. Select attributes for your variation. Click the triangle icon to expand the variation panel.
  4. Set the Regular Price.
  5. Check Enabled and Virtual boxes.
  6. Set SKU for your variation for accounting.
  7. If you plan to offer different number of ticket per variation, you should check Manage Stock and set the Stock Quantity field.
  8. If you want to set the number of tickets at the ticket level, click on Inventory tab, check Enable stock management at product level box, and set the
  9. Click on Save Changes button to save variations.

Linking the event ticket to Yoga Class event

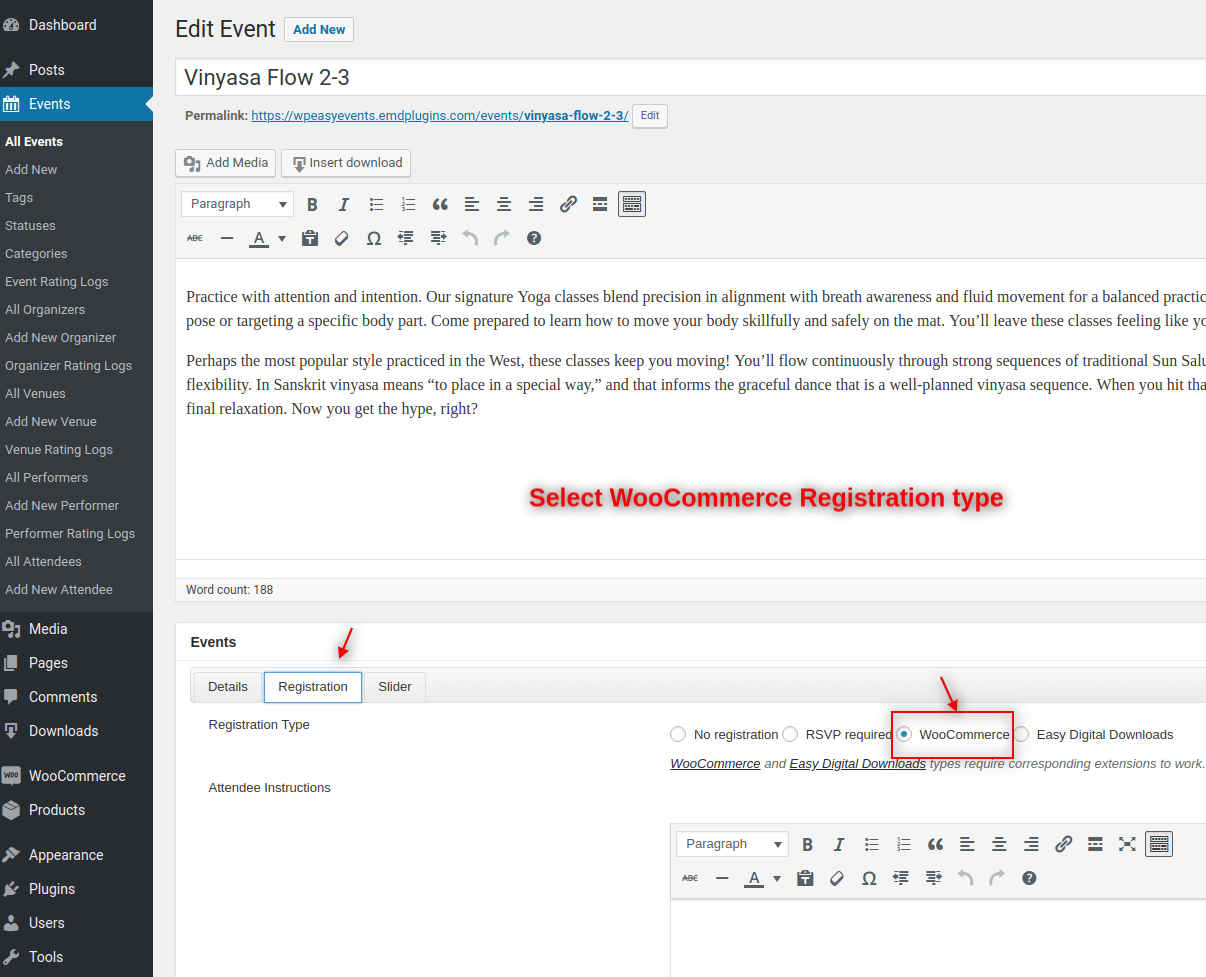
To be able to sell ticket to our Yoga Class, we need to link the event ticket product to our Yoga Class event. This task can be done either from the WooCommerce event ticket product page or event page.

If you're at the WooCommerce page,

  1. Find Events panel.
  2. Click on Create Connections link.
  3. Click on the Yoga Class event record.

If you're at the Yoga Class event edit screen,

  1. Find Woo Tickets panel.
  2. Click on Create Connections link.
  3. Click on the Yoga Class event ticket product record.

Creating the recurring events of Yoga Class event

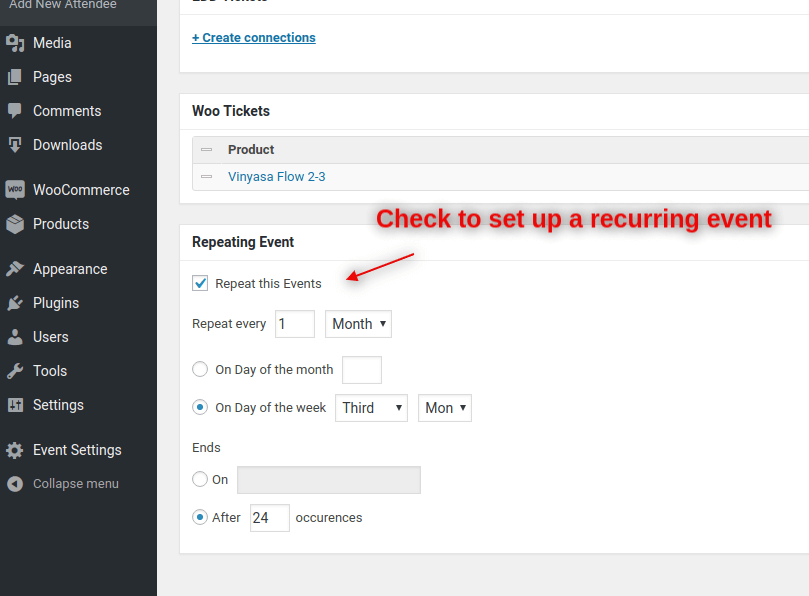
To be able create recurring events of our Yoga Class at the third Monday of every month for the next 24 months, we need need to convert our event to Repeatable event.

  1. Edit Yoga Class event
  2. Find Repeating Event panel
  3. Check Repeat this Event box
  4. Repeat every Day Week Month Year
  5. Set On Day of the week First Second Third Fourth Fifth Last Mon Tue Wed Thu Fri Sat Sun
  6. Set Ends After occurrences.
  7. Click Update button under Publish box.

What happens next

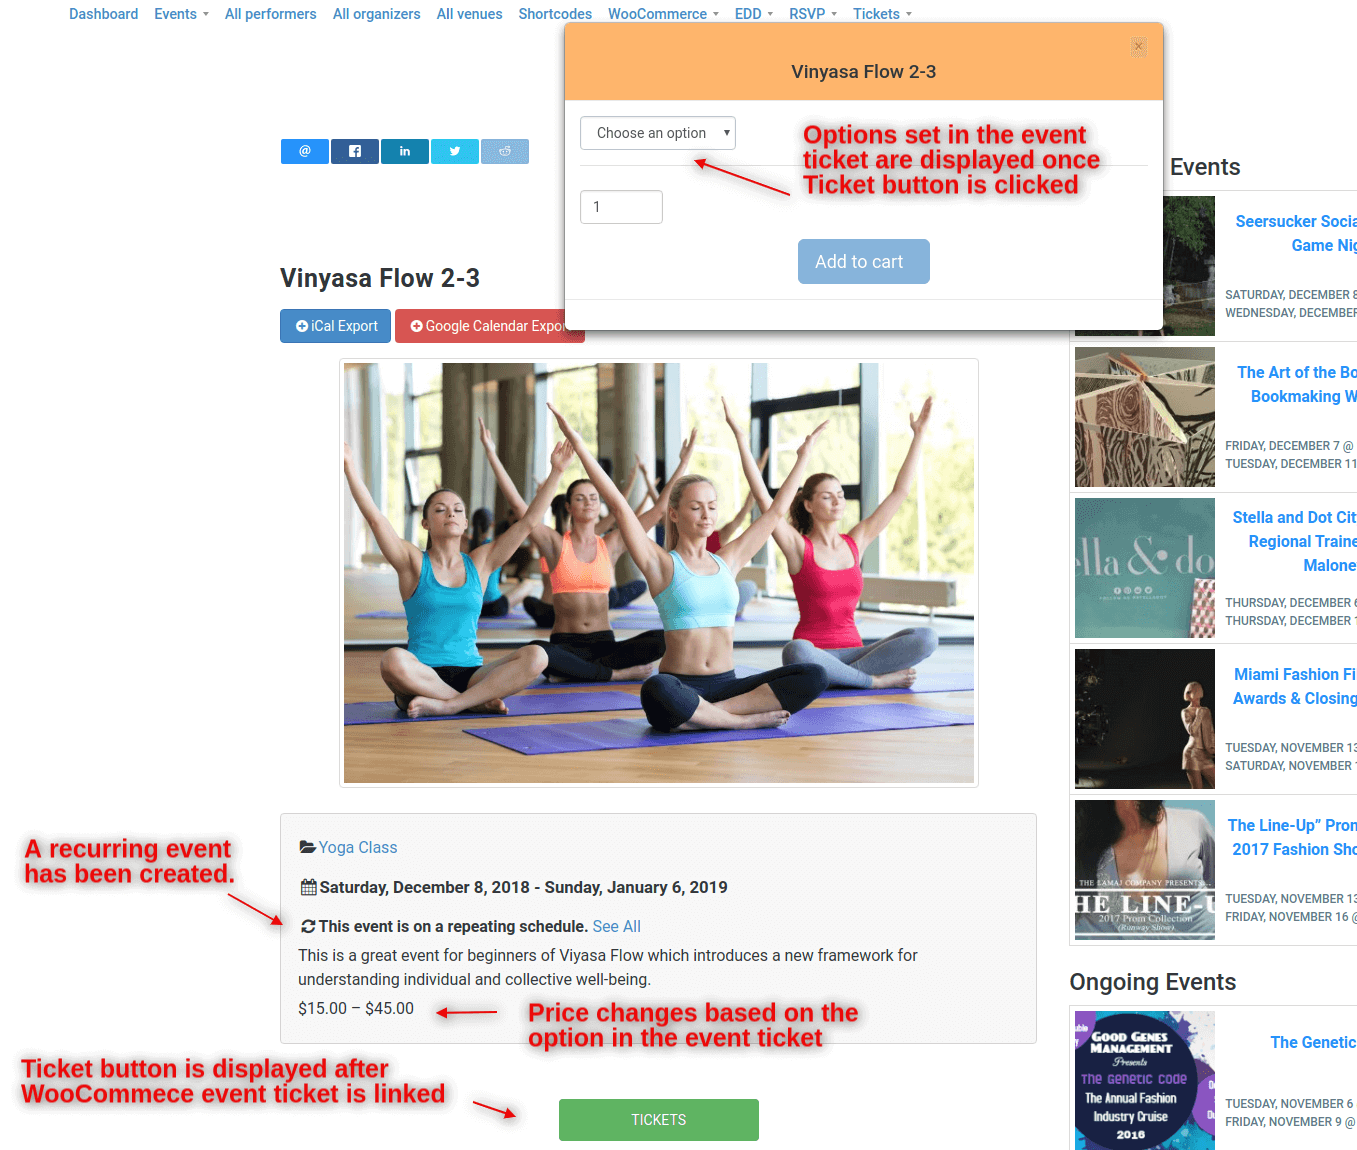
After following the directions above, your Yoga Class event page should look like:

Click to see the event page created in this exercise.

Please note that one big advantage of WP Easy Events WordPress plugin is that it allows event ticket sales from not only event pages but also from venue, organizer, performer pages.

Once customers purchase event tickets, they will get an email having a link to the event ticket page similar to:

Sample Event Ticket

On this page, customers can print or download their event ticket. Every event ticket has a QR code which has information on the event registration. Using a QR Code Reader/Scanner (freely available most App Stores), staff members can easily check in customers to our Yoga Class.


Was this information helpful?